Merry Christmas All!!!
I hope everyone has or will enjoy there Christmas Day .. :)
Sunday, 25 December 2011
Wednesday, 16 November 2011
(Stratum I) Plus a few odd's and end's
As mentioned previously I have been working on our first series of rockets to use multiple spliced pairs joined with tornado couplings.
 I have just finished making the fin set we are to use on this series, which in this case was the last piece of the puzzle and the rocket is now complete.


 I have just finished making the fin set we are to use on this series, which in this case was the last piece of the puzzle and the rocket is now complete.
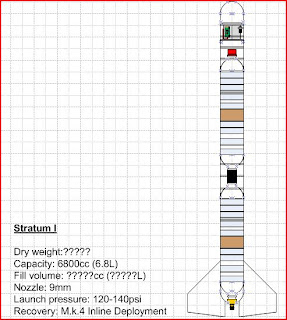
All the rockets STATS are displayed in the Visio drawing below:

As seen above we plan to make a more streamlined nose cone/deployment system for our rockets, this is something we hope to start on during the winter as well as some planned improvements to the launcher.
The improvements made will be to allow us to change the release heads for larger or smaller nozzles however the case may be, this will be done with a permanently plumbed in copper tube system.
I have also hollowed out a few of our tornado couplings and placed the seals kindly provided by George over at Air Command.

PARACHUTES!!
We have always used 2 small 20inch anti tangle chutes on our rockets these now however are much to small for the weight our rockets are gaining, therefore I have bought a large amount of thin Ripstop Nylon to make parachutes with.
The plan is to make 2 of each sizes consisting of 75cm, 1m and 1.5m diameter parachutes.
I have now started the Blog I mentioned previously about a traction engine build if anyone is interested. http://modelengineeringpursuits.blogspot.com/
Thank you for Reading
Doug
Thursday, 10 November 2011
Three New Splices Finally Finished
 |
| Veteran Fracture II Vessel serves as Strapping Tape Key |
 |
| The New Three Splices |
Two of these are going to be put to immediate use to make Stratum I (6.8 Litre Rocket) as mentioned in a previous post this will be our first rocket to use tornado couplings. More splices now however will be produced as spares and backups in case of a CATO or Crash that may occur.
 |
| A Sneak Peak of Stratum III the Largest Rocket Planned to Date the Vessel Currently Stands at 224cm (7ft 4in) |
Waiting to launch Stratum will also give us chance to give jet foaming a go, something we've been meaning to try since the assembly of Nexus I nearly 2 years ago!!
Regards Doug
I'm back!! Starting with the re-make of the In-line Dep. System
 |
| A collection of bits and pieces ready to start work |
I decided I'd start by remaking the In-line Deployment System which got heavily damaged during the last launch day due to a previously described (cough) mess up on my behalf. I decided to use the same design as previous but adding a few small alterations and strengthening features.
The first and main feature I wanted to change was the way the top parachute bay Disk was held in, before I had relied entirely on the correx press fit to sit snugly in between one of the bottles formed ribs and a skewer poked through to hold it all in place.
This method had the main problem that it would pop out due to the forces on launch, the only thing holding it still being the bamboo skewer which started to rip through the outer casing after the first launch even before the crash. Therefore this time it I have used sikaflex to glue it all in place giving it much more strength.
 |
| Top Disk glued in place using Sikaflex |
 |
| Sanded ready for gluing |
 |
| Sikaflex applied ready for positioning |
 |
| Assembly at the Half Way stage |
The Nose Cone, now not that it had any major issues in regards to how it worked I had come across a few bits and pieces I wanted to change. One thing I had noticed during a few flights is when the rocket was recovered the PET spring in the Nose Cone hadn't actually sprung back, it would get caught compressed to one side of the inner walls, so i made the change by using 2 rubber bands and 2 correx squares glued together at opposite orientations as the pressure plate. This change adds a little weight but the reliability gain i feel I'll have is invaluable especially now bigger parachutes are going to be a requirement.
The other small change to the Nose Cone is its size, its slightly larger then previous to accommodate larger parachutes.


 |
| The completed article |
I am going to try and get out and have a Launch day over the next week or two before the weather becomes totally insufferable.
I hope this update has been enjoyable and a good break of my Blog Silence as of late.
To the new followers of my Blog WELCOME! I hope you will find my progress interesting.
On another subject I will soon be starting another Blog Page based on another hobby of mine, I have started building a 2 inch to the foot scale traction engine of which I will be writing about should anyone be interested.
Regards Doug =]
Monday, 8 August 2011
Tornado Tubes!! And general bits & pieces
I recently ordered 10 tornado tubes, now based on our successful tests of splices and recovery system we can start to look at linking some splices together to make our Stratum series, I just need to make or order some seals to be used in the tubes.

The Green ones are going to remain with the smaller holes as they can be used for jet foaming (something we intend to have a go at with Nexus II once we have it flight tested).
I have also Replaced the old o-ring on the nozzle we found the problem was in fact it was too big and was folding up to where we saw it as it was being placed on the launcher, this in turn was stopping it from locking down properly. It wasn't the seal that came with the nozzle piece when bought anyway so we'll blame that :)
As for the abort valve problem i still need to test it but i found some grass stuck in the quick connector so George you were right it wasn't fully locking up correctly :P.
Friday, 5 August 2011
Launch Day 3/8/2011
Wednesday saw our first proper launch day in a few months. So here is the write up of the events of that day.

Everything setup and ready to go
Launch site: Sheep Field located behind our crew member Matthew Butcher's (Butch)
Weather: Cloudy with sunny spells
Wind: 0-6MPH
Crew: Doug, Matt & Ryan
A massive thanks goes to George over at Air Command, your servo timer has given us the best launch day we've had despite my momentary idiocy with not arming it.
Launches:

Nexus I Pre-Flight
Launch 1. Nexus I
- 100psi
- 1.3l of water
- This was the maiden flight of the In-Line Deployment System, The rocket had a relatively straight flight up and got good height, the parachute (to our amazement based on previous experiences as you tell in the video) opened just a little after apogee and glided down safely, a little head first admittedly, after this we moved the parachute tether up a little.
Launch 2. Nexus I
- 100psi
- 1.3l of water
- The rocket flew straight up and got good height it then.......... came straight back down :( In my excitement of the success of the previous launch I had forgotten to arm the Servo Timer the rocket was written off and the Parachute system damaged.

Fracture I Pre-Launch
Launch 3. Fracture I
- 90-100psi
- 1.1l of water
- This flight was the maiden flight of any splice for us in this case it was the Symmetric splice. The splice developed a nasty leak during pressurisation and due to an event earlier that day the launch abort mechanism was out of action we had launch quickly. The rocket flew relatively straight and due to the lower launch pressure the parachute came out well after apogee.

Fracture II Pre-Launch
Launch 4. Fracture II
- 130psi??
- 1.1l of water
- This was the maiden flight of our first Asymmetric splice. This flight had an unexpected launch as during pressurisation the rocket released itself itself, it got good height and the parachute deployed perfectly at apogee. no footage was caught.
Launch 5. Fracture II
- 130psi??
- 1.1l of water
- The same as the previous flight reoccurred due to this we lowered the launch pressure to 120psi for the rest of the day
Launch 6. Fracture II
- 120psi
- 1.1l of water
- The rocket had a good straight accent and the parachutes deployed right at apogee however they got caught on one of the fins, luckily in the last 7m of decent one of the chutes suddenly flared preventing any damage.
Launch 7. Fracture II
- 120psi
- 1.1l of water
- The rocket flew up at a slight angle due to the wind this flight, the parachute deployed a little after apogee and the rocket drifted a fair way from the launch pad.
Launch 8. Fracture II (Final Launch)
- 120psi
- 1.1l of water
- The rocket flew up dead straight and the parachute deployed just after apogee, the rocket landed without damage and not far from the launch pad. Nothing like a textbook flight to end a day.
Main Report
Overall we had our best flight day to date despite the odd hiccup, we originally didn't think we would fly due a thunderstorm which happily for us blew over.
Once we had set up and gotten Nexus I filled up and on the pad we started pressurising we reached around 30psi and our launch abort valve popped apart, we thought at first we may have just not connected it properly first time round so we plugged it back in and reset. Unfortunately it happened again so we ended up detaching it from the pad leaving it dangling as we thought the expansion in the pressure line could be causing it to move. This solution worked for a time but when it came to Fracture II with its higher launch pressures the connector gave up on us again, luckily Butch had a spare connector which we could use for the time being.
We are still unsure of the cause of this problem, the locking tabs appear to be completely undamaged and the locking sleeve is not any looser than before. We haven't had this problem with any of the other connectors but we feel it may be advisory to uprate our connectors for brass ones or some other metallic connector.
We discovered the cause for the premature launches, it was the o-ring seal on our nozzle being pushed up in the launcher due to the higher pressures and pressing against the locking tabs in the release head releasing the rocket itself.

Damage done to the In-Line Deployment System in its unfortunate flight on Nexus I was repairable on the field so we could use it again. however its shell does now need to be remade. After this incident we put the Servo Timer II back to option 0 so that it would self arm.
To-Do List:
Uprate launcher or Solve abort valve locking problem.
Order a harder rubber compound seal for the nozzle
Remake In-Line Deployment System
Make a electronics pod with room for a camera and other flight electronics
Make or Order a larger parachute as the two 20inch chutes aren't quite good enough.
Make a larger deployment system ready for the bigger rockets

The end of a successful day
Conclusion
A brilliant day that could have gone better minus the few hiccups but what ya gonna do eh? :P
I need to make sure the to do list is taken away and everything done and tested by next launch day.
A massive thanks goes to George over at Air Command, your servo timer has given us the best launch day we've had despite my momentary idiocy with not arming it.
Until then
Thank You for reading
Regards Doug
Thursday, 4 August 2011
Launch Day (Inline deployment and splices)
Today we finaly got off our behinds and got some rockets in the air :)
I will be writing up a more detailed post as soon as i have all the footage compiled

Thursday, 28 July 2011
Pressure Tests Ready for Next Week
Hey guys,
Ive decided its about time i had another launch day and finally get my Symmetrical and Asymmetrical splices in the air, so this week i have pressure tested both splices ready for a launch asap.
The Line-up will be:
Ive decided its about time i had another launch day and finally get my Symmetrical and Asymmetrical splices in the air, so this week i have pressure tested both splices ready for a launch asap.
The Line-up will be:
- Nexus I (has one flight behind its back and was used to fly the Parachute system M.k.3 which crashed) (will be used first to fly the In-Line parachute system)
- Fracture I (Symmetric Splice)
- Fracture II (Asymmetric Splice)
Sunday, 17 July 2011
New Inline Deployment System using Air Commands STII

Escape Water Rockets Inline Deployment System
I decided to go for something simple first just to get us back in the air as we've been a long time grounded. The pod is following the rough design that Air Command produced for an Inline Deployment System and for the electronics i have ditched my RC system and bought a couple of STII's (Thanks George) to control our system.

Deployment System:
http://www.aircommandrockets.com/day86.htm
Servo Timers:
http://www.aircommandrockets.com/servo_timer_V2_0.htm
One problem I've always had is making sure my Correx disks are in fact circular and the right size, and as i wanted most things to be as accurate as possible this time round i came up with a solution which I'd like to share.
I remembered i had a Dremel cutter down the shed with a cutting disk holder attachment so i thought why not attach the disk of Correx onto this disk holder spin it and sand it while it moves. So that's what i did.


I bought 2 of the STII's from Air Command and i intend to do something different with the second one although i am not 100% sure what that is yet, the expandability of the timers will help me think though.
I reinforced the area on the skin for the servo with another piece of PET glued to the outside skin.
Thank you for reading
Doug
Thank you for reading
Doug
Thursday, 2 June 2011
Hey guys
Hey Guys,
Unfortunately my old PC has finally kicked the bucket meaning I've lost alot of films and data, this is also the reason i haven't posted in a while, so I'm having to sort of catch up with where i am with my blog and where others are with there's.
With a heat wave supposedly approaching I'm itching to get the fleet ready for some intense testing and flights.
As mentioned briefly in my previous post i am left without a recovery system again so will be working on a new design over the coming week or so ready for the next launch day.
I am liking the progress others have made and am glad to be back on the news feed with the new PC :)
Regards Doug
Thursday, 21 April 2011
Parachute system failure
Hey Guys,
This is going to be a very brief post as i am currently away in Singapore and is the reason i haven't posted anything in a while.
Just before i flew out here the maiden flight of Nexus I (4l Single Robinson Coupling) was performed for this we used the parachute system displayed in the previous post.
This Launch day ended in mainly disaster as the parachute system failed to work again :( our foot pump broke and launch pressure we worked out was only around 60-70psi. Overall a rather disappointing day. :(
However there were a few things that worked very well despite maybe needing a few alterations or repairs these included:
The launcher
Nexus 1 (escaped mainly unscathed)
Launch Abortion System (Had to be used once due to idiocy :P)
I will sort out and upload the footage plus a more in depth post when i return to England.
Regards Doug
Thursday, 10 March 2011
Parachute System
I realised i have never explained or run through the workings of our Parachute Deploy System so here it is. :) Also in the Video I forgot to mention using the transmiter and reciver allows for expantion of up to 3 servos to do more.
Regards Doug
Regards Doug
Tuesday, 8 March 2011
Splice Pressure Test
Today the asymmetrical splice was tested :)

The setup is as follows, splice and supply line full of water and the splice submerged, air supply is the mains powered home compressor. I used the test as a chance to test the mini compressor too.


The above pictures show the point of failure after the tape was split at 185psi
Things i taking away from this test are:
I am also considering importing some PL Premium to make splices, this is because of the annoying and very messy expansion of polyurethane available in this country along with the fact it must be mixed with some form of powder to be at all workable.
Anyways I hope the results have been as interesting for you guys out there as they have been for me.
Regards Doug

The setup is as follows, splice and supply line full of water and the splice submerged, air supply is the mains powered home compressor. I used the test as a chance to test the mini compressor too.


The above pictures show the point of failure after the tape was split at 185psi
Things i taking away from this test are:
- The Mini Compressor is garbage above 50psi and took 10 minutes to get there ... BIN IT!
- Put less glue on the splice joins.
- Remember to wrap the tape a little tighter round the bottom of the sleeve.
- Submerging the makes it a little quieter but still scares you when you have a load of water shoot 3ft in the air. :P
I am also considering importing some PL Premium to make splices, this is because of the annoying and very messy expansion of polyurethane available in this country along with the fact it must be mixed with some form of powder to be at all workable.
Anyways I hope the results have been as interesting for you guys out there as they have been for me.
Regards Doug
Tuesday, 1 March 2011
Asymmetric Splice Attempt
Hey guys, over the past few days i gave the Asymmetric splice a go, so here's how its going so far.
 Step 1: 4 Clean bottles with the cap rings and bottoms removed.
 Step 2: 1 Bottle shrunk and curled and both sanded with electrical tape marking added.
 Step 3: Sikaflex applied and waiting to dry.
 Step 4: 1 Day later and the Sikaflex is dry and the tape is removed along with the excess beading of glue.
 Step 5: Marked out and sanded ready for the Titebond and Polyfiller glue mix.
 Step 6: Glue applied and left to set for a Day or two.
 Step 7: Glue used on the main collar has been allowed to set for a day and tape is removed. The small square to cover the slot is now applied.
 The Finished Join :)
I am waiting on and order of glass strapping tape to ad the strengthening sleeves, by the time it arrives the splice will have been given time to fully cure and i shall test the splice after adding the sleeves. :)
Thanks again to George and the crew over in Sydney for the tutorial. http://www.aircommandrockets.com/construction_6.htm
Regards Doug
Friday, 7 January 2011
Launcher Tests
We ran some tests on our new launcher today so here they are on youtube :)
We are planning a day which we can take our gear up to the launch site soon, this will be the maiden flight of our new recovery pod as well as the maiden flight of Nexus I our first robinson coupling.
Hopefully this will be in the not to far future :) Hope your all having a good new year so far.
Regards Doug and the Crew :)
Subscribe to:
Posts (Atom)